Github项目 | 几行代码即可实现人脸检测、目标检测的开源计算机视觉库
今天介绍一个简单、易用的开源计算机视觉库,名字是cvlib。
其 Github 地址:
https://github.com/arunponnusamy/cvlib
官方文档地址:
http://cvlib.net/
安装cvlib
这个库首先需要安装这两个库:
1) tensorflow
2) topencv
快速的安装方法是:
,安装 gpu 版本需要注意安装正确版本的英伟达驱动、CUDA、CUDNN。接着就是正式安装 cvlib,简单的安装方法是通过 pip:
主要功能
目前 cvlib支持以下几种应用:
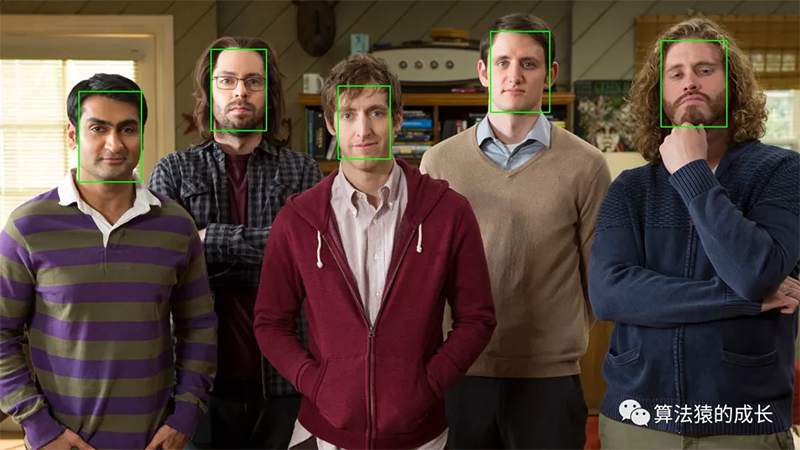
1)人脸检测
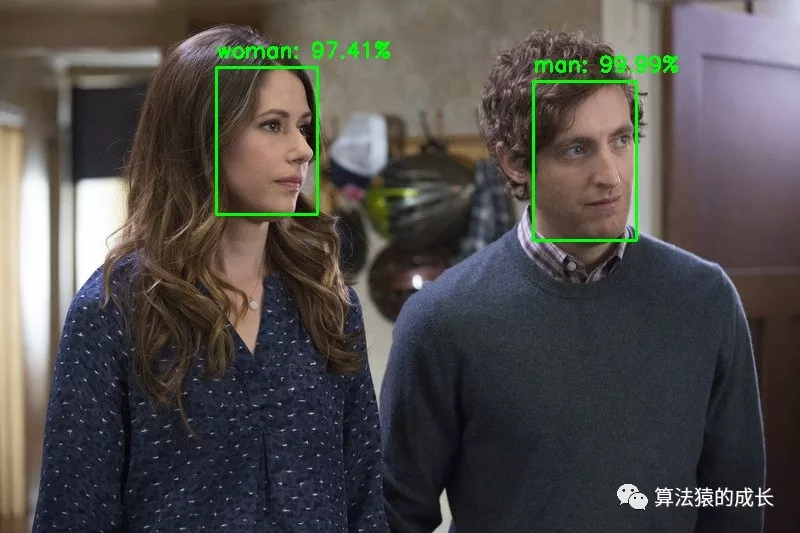
2)性别检测
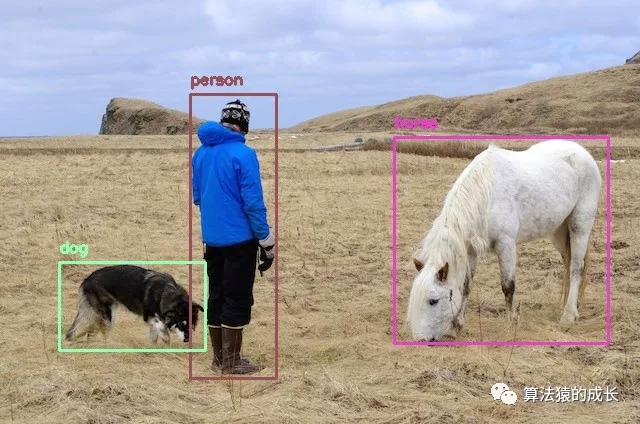
3)目标检测
人脸检测
人脸检测的接口是 detect_face(),返回的结果是所有检测到的人脸的一个坐标点和置信度。
代码示例如下:
人脸检测的底层实现其实是通过 OpenCV 的 dnn模块,并加载一个预训练的 caffemodel。
性别检测
性别检测的接口是 detect_gender(),返回的是标签(男性or女性)以及预测的概率。
代码示例:
从示例代码可以看到,首先是需要检测人脸,然后将人脸部分传入性别检测接口,再得到最终的检测结果。其底层实现是采用 keras 的预训练模型,不过其准确率并不是特别的高,所以可以自己优化模型,提升性别检测的准确率,然后替换模型。
目标检测
目标检测的接口是 detect_common_objects(),它用于检测常见的物体,返回结果是图片中检测到的物体的坐标、类别标签以及置信度。
代码示例如下:
目标检测的底层实现是采用在 COCO 数据集上训练的 YOLOv3 模型。
另外,上述三个功能其实不仅是对图片进行检测,还可以实时调用,通过摄像头捕捉到的实时返回结果,代码例子可以查看:
https://github.com/arunponnusa ... herit其他功能
除了上述三个主要功能,其实 cvlib也还能实现以下两个功能:
1)获取视频的帧
2)生成 gif 动图获取视频的帧是在 utils.py中的函数 get_frames(),输入是视频的路径,使用方法如下代码所示:
https://github.com/arunponnusa ... 23L48
https://github.com/arunponnusa ... herit小结
今天介绍的计算机视觉库 =inheritcvlib是一个非常容易上手的工具,简单实现了人脸检测、性别检测和目标检测三个非常常用的应用。
最后,前两张图片其实是来自一部美剧《硅谷》,这是一部讲述几个程序员创业的故事,非常有趣又有常见的程序员梗,目前出了第四季,第五季也是最后一季估计是在年底播出,还是非常推荐大家看看的。
其 Github 地址:
https://github.com/arunponnusamy/cvlib
官方文档地址:
http://cvlib.net/
安装cvlib
这个库首先需要安装这两个库:
1) tensorflow
2) topencv
快速的安装方法是:
pip install opencv-python tensorflow当然上述安装的 tensorflow 是 cpu 版本,如果希望安装可以使用 gpu 的,安装包名字是 tensorflow-gpu
,安装 gpu 版本需要注意安装正确版本的英伟达驱动、CUDA、CUDNN。接着就是正式安装 cvlib,简单的安装方法是通过 pip:
pip install cvlib如果是希望升级到最新版本,命令为:
pip install --upgrade cvlib第二种通过源码安装方法,只需要按照下列命令依次执行即可
git clone https://github.com/arunponnusamy/cvlib.git注意:目前仅在 Python 3.x 版本测试通过,而 2.x 版本并没有进行测试,所以建议在 Python 3.x 环境使用该库。
cd cvlib
python setup.py sdist
pip install .
主要功能
目前 cvlib支持以下几种应用:
1)人脸检测
2)性别检测
3)目标检测
人脸检测
人脸检测的接口是 detect_face(),返回的结果是所有检测到的人脸的一个坐标点和置信度。
代码示例如下:
import cvlib as cv输出结果如下所示:
import sys
import cv2
import os
# read input image
image = cv2.imread(sys.argv[1])
# apply face detection
faces, confidences = cv.detect_face(image)
print(faces)
print(confidences)
# loop through detected faces
for face,conf in zip(faces,confidences):
(startX,startY) = face[0],face[1]
(endX,endY) = face[2],face[3]
# draw rectangle over face
cv2.rectangle(image, (startX,startY), (endX,endY), (0,255,0), 2)
# display output
# press any key to close window
cv2.imshow("face_detection", image)
cv2.waitKey()
# save output
cv2.imwrite("face_detection.jpg", image)
# release resources
cv2.destroyAllWindows()
人脸检测的底层实现其实是通过 OpenCV 的 dnn模块,并加载一个预训练的 caffemodel。
性别检测
性别检测的接口是 detect_gender(),返回的是标签(男性or女性)以及预测的概率。
代码示例:
import cv2输出结果如下所示:
import cvlib as cv
import sys
import numpy as np
# read input image
img = cv2.imread(sys.argv[1])
# apply face detection
face, conf = cv.detect_face(img)
# loop through detected faces
for f in face:
(startX,startY) = f[0],f[1]
(endX,endY) = f[2],f[3]
# draw rectangle over face
cv2.rectangle(img, (startX,startY), (endX,endY), (0,255,0), 2)
face_crop = np.copy(img[startY:endY, startX:endX])
# apply gender detection
(label, confidence) = cv.detect_gender(face_crop)
print(confidence)
print(label)
idx = np.argmax(confidence)
label = label[idx]
label = "{}: {:.2f}%".format(label, confidence[idx] * 100)
Y = startY - 10 if startY - 10 > 10 else startY + 10
cv2.putText(img, label, (startX, Y), cv2.FONT_HERSHEY_SIMPLEX,
0.7, (0, 255, 0), 2)
# display output
# press any key to close window
cv2.imshow("gender detection", img)
cv2.waitKey()
# save output
cv2.imwrite("gender_detection.jpg", img)
# release resources
cv2.destroyAllWindows()
从示例代码可以看到,首先是需要检测人脸,然后将人脸部分传入性别检测接口,再得到最终的检测结果。其底层实现是采用 keras 的预训练模型,不过其准确率并不是特别的高,所以可以自己优化模型,提升性别检测的准确率,然后替换模型。
目标检测
目标检测的接口是 detect_common_objects(),它用于检测常见的物体,返回结果是图片中检测到的物体的坐标、类别标签以及置信度。
代码示例如下:
import cvlib as cv输出结果:
from cvlib.object_detection import draw_bbox
import sys
import cv2
# read input image
image = cv2.imread(sys.argv[1])
# apply object detection
bbox, label, conf = cv.detect_common_objects(image)
print(bbox, label, conf)
# draw bounding box over detected objects
out = draw_bbox(image, bbox, label, conf)
# display output
# press any key to close window
cv2.imshow("object_detection", out)
cv2.waitKey()
# save output
cv2.imwrite("object_detection.jpg", out)
# release resources
cv2.destroyAllWindows()
目标检测的底层实现是采用在 COCO 数据集上训练的 YOLOv3 模型。
另外,上述三个功能其实不仅是对图片进行检测,还可以实时调用,通过摄像头捕捉到的实时返回结果,代码例子可以查看:
https://github.com/arunponnusa ... herit其他功能
除了上述三个主要功能,其实 cvlib也还能实现以下两个功能:
1)获取视频的帧
2)生成 gif 动图获取视频的帧是在 utils.py中的函数 get_frames(),输入是视频的路径,使用方法如下代码所示:
import cvlib as cv也可以添加一个保存所有帧的文件夹路径,返回的帧 frames是用列表保存的 numpy数组形式。
frames = cv.get_frames('~/Downloads/demo.mp4')
frames = cv.get_frames('~/Downloads/demo.mp4', '~/Downloads/demo_frames/')生成 gif 动图则是函数 =inheritanimate()实现的,它需要输入一批图片或者保存图片的文件夹路径,然后返回一个 gif 并保存。cv.animate(frames, '~/Documents/frames.gif')这两个功能,具体可以查看:
https://github.com/arunponnusa ... 23L48
https://github.com/arunponnusa ... herit小结
今天介绍的计算机视觉库 =inheritcvlib是一个非常容易上手的工具,简单实现了人脸检测、性别检测和目标检测三个非常常用的应用。
最后,前两张图片其实是来自一部美剧《硅谷》,这是一部讲述几个程序员创业的故事,非常有趣又有常见的程序员梗,目前出了第四季,第五季也是最后一季估计是在年底播出,还是非常推荐大家看看的。
作者:KBSC13
来源:算法猿的成长
本篇文章为 @ 21CTO 创作并授权 21CTO 发布,未经许可,请勿转载。
内容授权事宜请您联系 webmaster@21cto.com或关注 21CTO 公众号。
该文观点仅代表作者本人,21CTO 平台仅提供信息存储空间服务。
评论
21CTO
管理团队最新文章
我要赞赏作者
请扫描二维码,使用微信支付哦。


